If you connect two or more speakers in you system, you can use a line
transformer (Radio Shack Cat. No. 320-1031) for each speaker.

Transformers offer these advantages:

    You can use speakers that have different impedances without causing
    differences in output between the speakers.

    You can add or remove a speaker from the system without having to
    recalculate the impedance for the entire system.

    You can reduce signal loss when you use runs of speaker wire over 50
    feet-15m long.

NOTE:  Use 18-gauge speaker wire for lengths up to 25 feet (7.5m), and use
       16-gauge wire for lengths more than 25 feet (7.5m).

Line transformers have several connectors called taps.  The primary taps
are on one side of the transformer, and are marked as 10, 5, 2.5, 1.25 and
0.62 watts.  The secondary taps are on the other side of the transformer,
and are marked as 4, 8 and 16 ohms.

CONNECTING THE PRIMARY TAPS

Before you connect speakers, be sure the total wattage of the primary taps
you intend to use does not exceed the amplifier's power rating in watts.

1.  Connect the desired primary taps to the amplifier's 70V terminal.

NOTE:  Usually, each speaker in a system uses the same wattage.  If you
       want a particular speaker to have a higher volume level, use a
       higher wattage tap on its transformer.

2.  Connect the C (common) taps on the transformers' primary side to the
    amplifier's COM (common) terminal.

CONNECTING THE SECONDARY TAPS

To connect the secondary taps of each transformer, follow these steps.

1.  Connect the speaker's positive (+) terminal to the transformer's
    secondary tap that matches the speaker's impedance.

2.  Connect the speaker's negative (-) terminal to the C (common) tap on
    the transformer's secondary side.
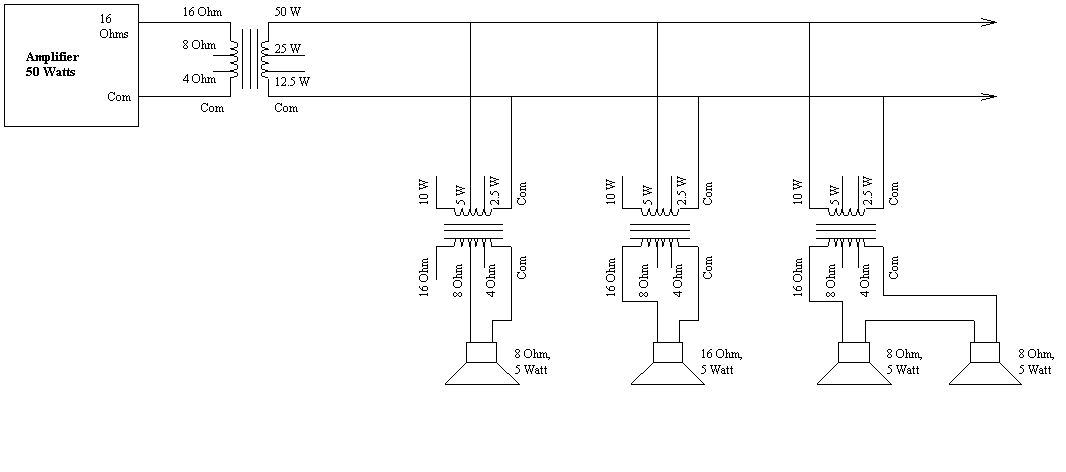
The following drawing shows an example of how to wire several speaker
stations in a set to a single amplifier.
(Click on it for a larger, more legible view!)